My Portrait Drawing Process
- Anna Bland

- Feb 7, 2020
- 10 min read

One of the things that I have loved doing ever since my first children were very small is drawing portraits of them. I find them endlessly fascinating subjects because I have thousands of photos of them to draw from, I know each of their faces better than I know my own, they are constantly growing and changing and each one has their own distinct personality and spark, and of course I'm just a little biased because I love them so much.
Portraits are always tricky and delicate, but portraits of babies and children are significantly more so. Children not only have different proportions than adults, but also much softer, rounder, more delicate features and skin. It is very important when drawing children to keep all your shading soft and delicate. If your lines or shading ever become too harsh, you will lose your footing and end up with a drawing of a terrifying nightmare child.
I usually prefer to keep my portraits simple by not including any background. I love a graphite sketch on a white background. Classic, clean, no distractions. I don't go for a photorealistic style. I feel like if I want the photo, I'll just look at the photo. Rather than a literal copy, I'm going for an accurate but pared-down translation of the image I'm working from, rendered into the medium of pencil drawing, rather than a hyper-realistic copy of the image. I tend to lighten the values from the photos I work from, to create a lighter, softer final image. I like the overall drawing to have a lighter value, and sparingly use deep dark values for focal points like eyes and mouths.
Generally speaking, each photo stage I'm showing here represents one sitting with the drawing. These sittings can take anywhere from 20-60 minutes, depending on the complexity of the task. I would say that on average, each stage you see here represents around 45 minutes of work. For those of you wondering how I fit this logistically into my life, I usually draw or paint when at least my younger two children are asleep or otherwise not needing me for an extended period of time. This week, I happened to be quite ill and sequestered in bed for three days to prevent my children from getting my germs. My husband and my mom were on child duty, and once I felt up to sitting up more, I got some drawing done and worked on this blog. I also do break up the sittings into bite sized chunks of time when necessary, though this is much easier to do with the later stages of shading and detailing, rather than stopping in the middle of a layout sketch.
What I'd like to do in this post is walk you through a few of my recent sketches of my children, and show you a little bit of my process. I won't be doing a tutorial by any stretch of the imagination, but I'll answer some of the questions I get a lot about my process and give you a peek at different stages of my sketches. All of these are from my sketchbook over the past week or so, and the "finished" products are finished to my sketchbook level, not fully cleaned up and polished for display. Each of these would probably take one more full sitting of polishing up and finishing to get them ready to frame and display. I hope you find it both entertaining and enlightening!
Supplies I used in these drawings:
Sketchbook: 11x14 spiral bound hardcover sketchbook, 65 lb, acid free
Graphite Pencils: 3H for grid and layout sketch, 4B for details and shading, and 6B for deepest values
Erasers: Kneaded eraser and fine eraser stick
Printer/paper
Ruler
Drawing Number One: The Nursling
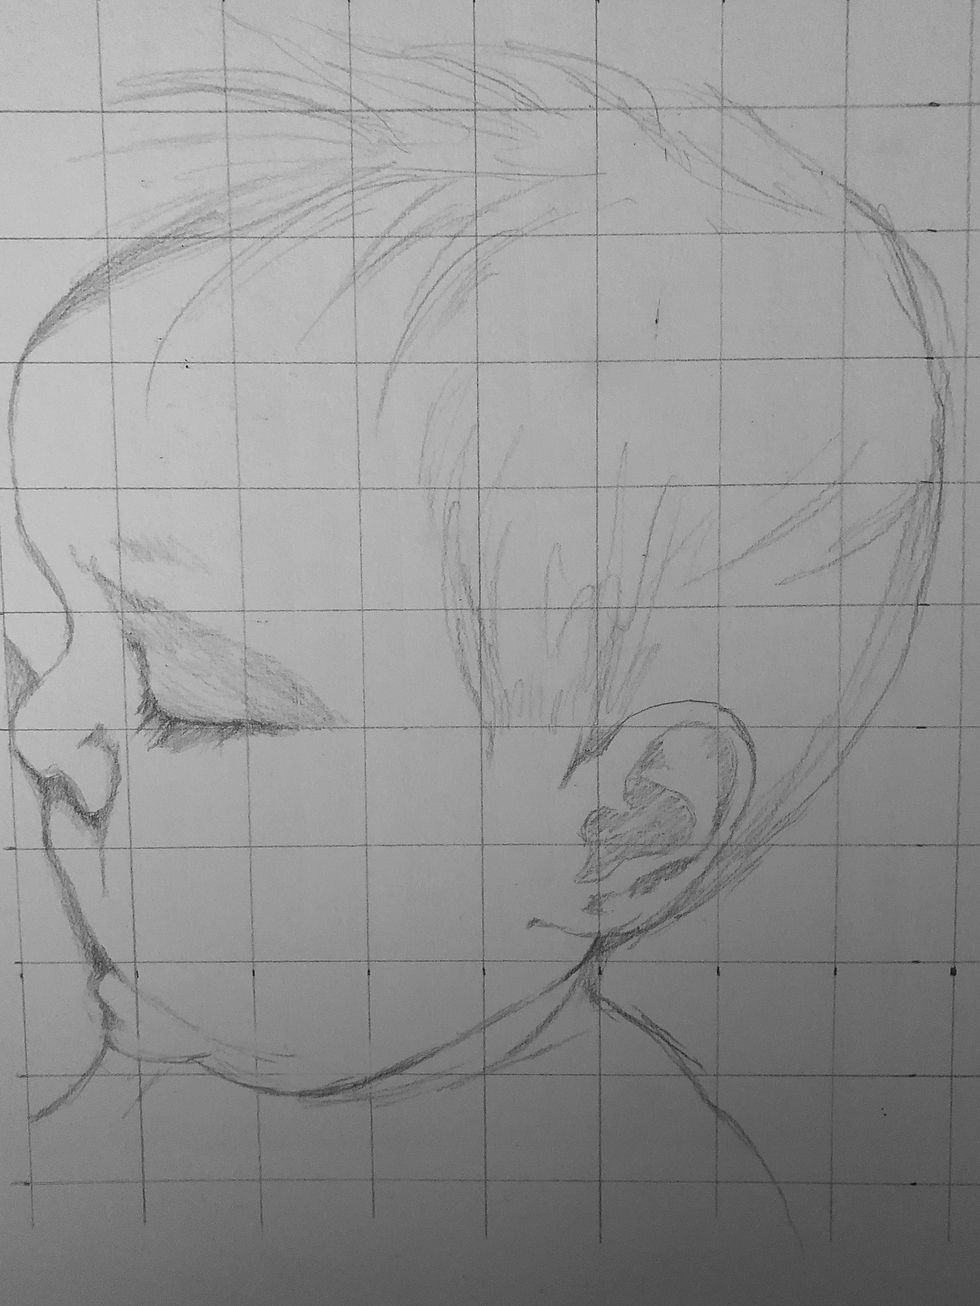
Step 1: The Rough Layout Sketch
I work from photographs rather than life for all my portrait work, but especially for my children. Occasionally I will sketch a rough figure drawing as I watch them sitting or playing, but for more detailed work like this, they just can't stay still long enough for me to get anything on paper. I use a grid layout for most of my portrait work, because it helps me stay true to the proportions in the photo I'm working from, work in shorter chunks of time without losing my place, and since I draw in different places and positions, I don't have as many issues from holding my sketchbook at different angles. I print a black and white copy of the photo on a full sheet of printer paper and draw a grid directly on the photo. Then I scale up or down, depending on the size of drawing I'm doing and make a corresponding grid with light pencil on my page.
You'll notice that in the initial sketch, I'm not worried about a lot of shading or detail. I am laying down the overall composition and shape, as well as the first run at a couple of key focal points Here, the focal points will be the eye/nose area and the ear, because they will have the most detail and the darkest shading. You may notice that the curve of the head should keep your eye moving from one focal point to the other, probably from the eye around towards the ear, and the curve of the beautiful baby neck folds and jaw up through the mouth should return you to the eye.

Step 2: Adding Some Detail and Depth
Once I finished the layout sketch, I went through and erased my grid lines. Then I began adding some shading and deepening some values. In this particular drawing, I wanted to keep shadows to a minimum (as discussed, the younger the subject, the more sparingly I shade). I wanted to keep a stronger focus on the outline of his profile and the movement of the eye around the composition. You may notice that I didn't quite draw in his eyebrows. This child has fair skin and light hair, so the goal was to use delicate shadows under the actual eyebrows to give the impression of eyebrows that aren't quite visible. Ears are fascinating and complex, and I enjoy drawing them. Did you know that everyone's ears are as unique as fingerprints?
Our lighting in this picture is from above his head, so the top of his hair is going to be much lighter than the hair at the back of his head. There are light shadows under his chin, ear, nose, brow, and mouth. It didn't take much to show an accurate depiction of the light, and doing it creates so much depth and softness.
(Sidenote: This is my child, and I had never noticed until I was drawing this portrait that he has attached earlobes! I think he's the only one of my children who does.)

Step 3: Finish the Sketch
Finally, I deepened some of the shadows, used an eraser to soften others, added more detail into the hair and ear, and added a deep shadow in the lower left under his chin to ground the composition and keep it from feeling like he's floating off in space. I cleaned up some lines with my eraser, and that was it! This sketch is done! I actually really love this piece. I think it turned out beautifully.
Drawing Number Two: The Brown Eyed Girl

Step 1: Layout
Same process again! This time I used a larger grid because I was scaling up more from the photo I used. This particular drawing had some fun challenges. First, the tilt of her head made the positioning of her features a challenge. Her expression was also a little tricky, as she was pressing her lips together in a slight smile. Those diagonal lines (the eyes, eyebrows, and mouth) works together with the curve of her hair up and around from the lower left corner to the top and back down the other side to again create movement in the viewer's eyes and a dynamic composition that should draw your eye in.
This child is one that I have always found challenging to draw. Her coloring is darker and her features are more angular than some of her siblings', and it can be very hard to depict those things while maintaining softness and delicacy. My drawings of her often become harsh and dark, with too much shadow.

Step 2: Detail and Depth
Unlike the last drawing, here we have two open eyes and a full nose and mouth to tackle. That means a whole lot more detail in it and a lot more time investment! Here we go!
The key to keeping life in the eyes is to always include a sliver of light reflected in the eye. Without that, eyes look flat and dead. Also, the whites of the eye shouldn't be pure white. Shadows give them dimension and show that the eye is spherical. Again, I'm not looking for photorealism here. There are some amazing videos online of artists creating hyper realistic eye drawings. It's a very cool exercise, but it's not my goal in this type of drawing.
Step 3: Finish
In most of my portraits, eyes will be the main focal point. Here, that was a very natural choice because this child has dark brown eyes, and it was only natural to make them bold. I used a kneaded eraser to soften up my contour shadows on her face to avoid the harsh shadow problem I've run into in the past. I especially enjoyed drawing her hair, which is one of her most striking features. She has waist length curly brown hair that is just gorgeous, and it was a lot of fun to draw. I am very pleased with how this one turned out!
Drawing Number Three: The Blue Eyed Girl

Step 1: Layout
I used a larger grid again for this sketch. Our tricky elements here are the hand and the slight turn of her head, half-braided hair, as well as a certain sweetness I'm hoping to capture in her half-smile.
This is my fair-haired, blue-eyed girl, and she's awfully fun to draw.
In this initial layout sketch, I wasn't thrilled with her left eye (on the right of the image) and cheek shape. I planned to rework them in the next stages.

Step 2: Adjustments and Details
You can see that I've redrawn both that left eye and the curve of the cheek. I also did quite a bit of shadow work in the contours of her face, but her chin doesn't feel quite right yet. Her hair on her right side is looking pretty good, but falling a little flat on her left. The hand needs some work and the neck is a little iffy. Her actual features are looking more like her, though!

Step 3: Final Adjustments and Shading
I lightened and softened some shadows with my kneaded eraser, added detail in the hair, hand, and shirt, and adjusted some of the shading. I added the shadows on her neck and made some minor adjustments to her jawline and the curve of her cheek.
I will say that I'm not as pleased with the outcome of this one as I have been with some others I've done of her. I don't think it's a bad sketch, but I also don't feel like this captures her likeness the way I have in previous drawings. I might revisit this and work more on it another time, or I might just leave it and move on.
Drawing Number Four: The Brown Eyed Boy

Step 1: Layout
This is another child that has always proven difficult for me to capture. Just like with my brown eyed girl, I tend to get a little heavy handed on the shadows due to his coloring and deeper, bolder features. I like to joke that he is a walking cartoon character full of expression and movement, and that makes him hard to draw in this style (he'd make a great caricature). I'll try to keep it soft this time...
Here we go with our cartoon boy! He's full of life and personality, and I want that to come through the sketch, without getting heavy handed or overdoing it. His mouth is very wide, which has the potential to trip me up in the drawing, along with the deep shadows he gets in his facial creases because he smiles so big. His smile is a bit goofy in this picture because that's just how he smiles in real life. When he's really smiling like in this picture, his eyes squinch up and just about disappear. He is not of Asian descent, so I need to try to show that his narrow eye shape is due to his facial expression and not his ethnicity.

Step 2: Detail and Depth
Again you'll notice that I've erased my grid lines after laying out the initial sketch. As before, this step is all about going over the whole drawing and adding depth in shadowing and detail, as well as deepening the color value in the focal points such as the eyes and mouth.
In the photo I'm working from, there are strong, dark shadows on the left side of the image. The light is definitively from the right side of the picture. The trick here is to stay true to the light and shadow without creating too much darkness or harsh contrast. It's a fine line to walk. I'm shading lightly with the side of a 4B pencil to get the shadows in there to contour in the right places, and then blotting over it with a kneaded eraser to soften it and lighten it up.
At this point I'm seeing that his left cheek (right side of the image) is a bit flat around the edge and his right cheek looks a bit puffy. I'll make a note of that and try to address it in my next step. I'm also noticing that his hair looks a bit flat, so I'll probably add some life there. Overall I'm feeling like his face looks narrower here than in life, so I'll fiddle with that a bit too, but try not to overdo it.

Step 3: Final Adjustments and Details
I adjusted the lines that I mentioned in the previous step, added shading into the folds of his shirt and a bit of dimension into his hands and arms. I didn't spend too much effort on the hands and arms, because they are not the important part of this drawing. I did just enough to give the impression of them and make them fit with the rest of the piece. Compositionally, you'll notice that his face (obviously the focus of the piece, with the eyes and smile being the focal points within the face) is situated in the top third and left two-thirds of the drawing, with the lines of his shoulders and arms, echoed in the lines of his collar, pulling the eye around the rest of the piece. You should get a sense of his perpetual motion in the way he's in the middle of shifting his weight from one elbow to the other, as well as his lively facial expression.
This is the best drawing I've done of this child yet, but I still have hopes of doing better in the future.
Well, that's that! Kudos to you if you stuck with me to the end. This was a long one! Please comment with any questions you have that I didn't get to in this post, and if you're working on any drawings right now, I'd love to see them!


Comments